看板PC_Shopping
網頁好讀版
https://forums.geforce.com.tw/viewtopic.php?f=7&t=940
==============================================================================
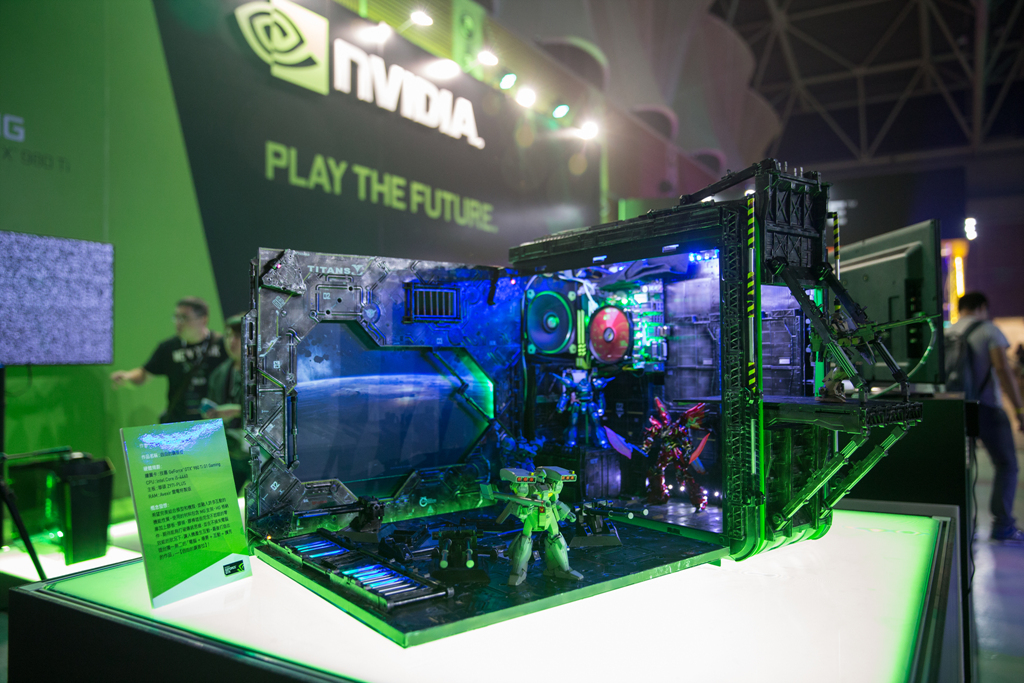
http://picx.xfastest.com/elvis/Event/201509-WirForce/029.jpg
今年 NVIDIA 首度舉辦的 GeForce Garage 機殼改裝大賽,小弟與朋友的作品很榮幸獲得各路好友的抬愛,在票選過程中獲得優勝,因此就來跟大家分享一下製作歷程。
本作品主要目的是讓模型跟機殼能做一個完美的結合,我們不希望者只是一個單純的機殼,所以把許多互動的機能性質融合進去,並追加自己喜歡的元素。只有是用一些簡單又不起眼的零件拼湊出來,期待能夠打破許多傳統思維的觀念,進階的用創意翻轉機殼的想法,在不讓損失電腦效能之下,又能讓使用者與機殼產生互動,就完成了這座包含「電腦+場景+互動+擴充」的作品-【自由的鋼普拉】!
http://picx.xfastest.com/elvis/Event/201508-Garage/01.jpg
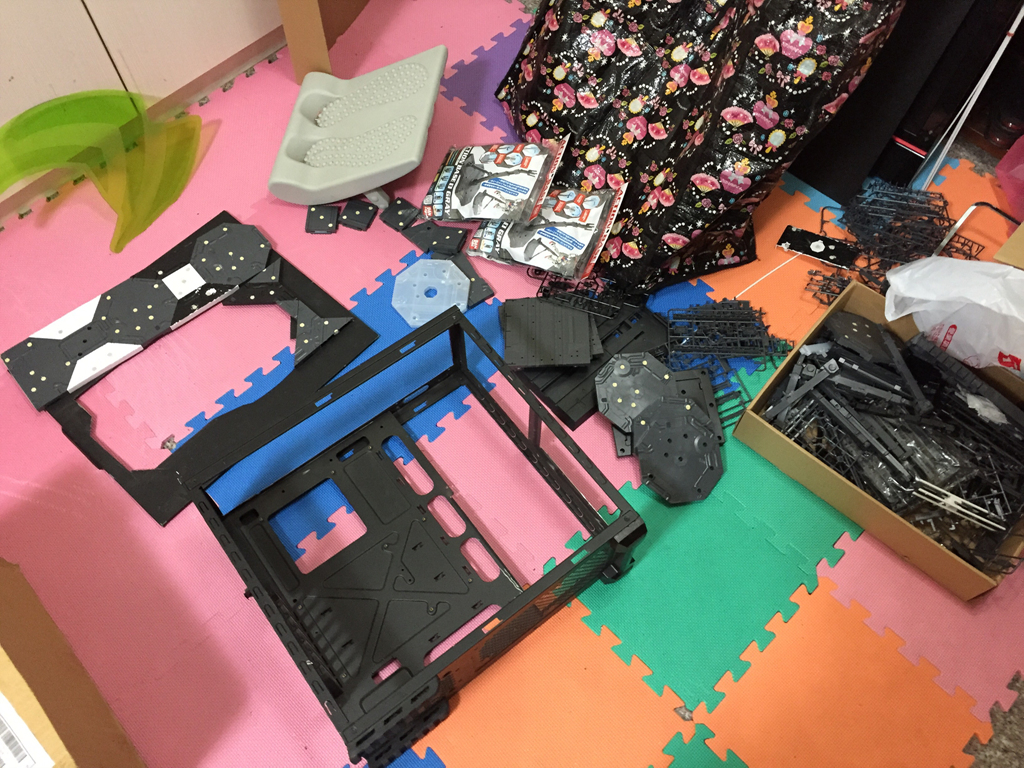
機殼原型,就是這咖用了3年多的 CoolerMaster 的 CM 690 II Advanced NVIDIA Edition,等一下就會把它切到連它媽都認不出來。
http://picx.xfastest.com/elvis/Event/201508-Garage/02.jpg
已經切割好的機殼,一旁是MG支架、HG格納庫加上膠板、膠條、膠棒等材料。
http://picx.xfastest.com/elvis/Event/201508-Garage/03.jpg
http://picx.xfastest.com/elvis/Event/201508-Garage/05.jpg
http://picx.xfastest.com/elvis/Event/201508-Garage/06.jpg
http://picx.xfastest.com/elvis/Event/201508-Garage/07.jpg
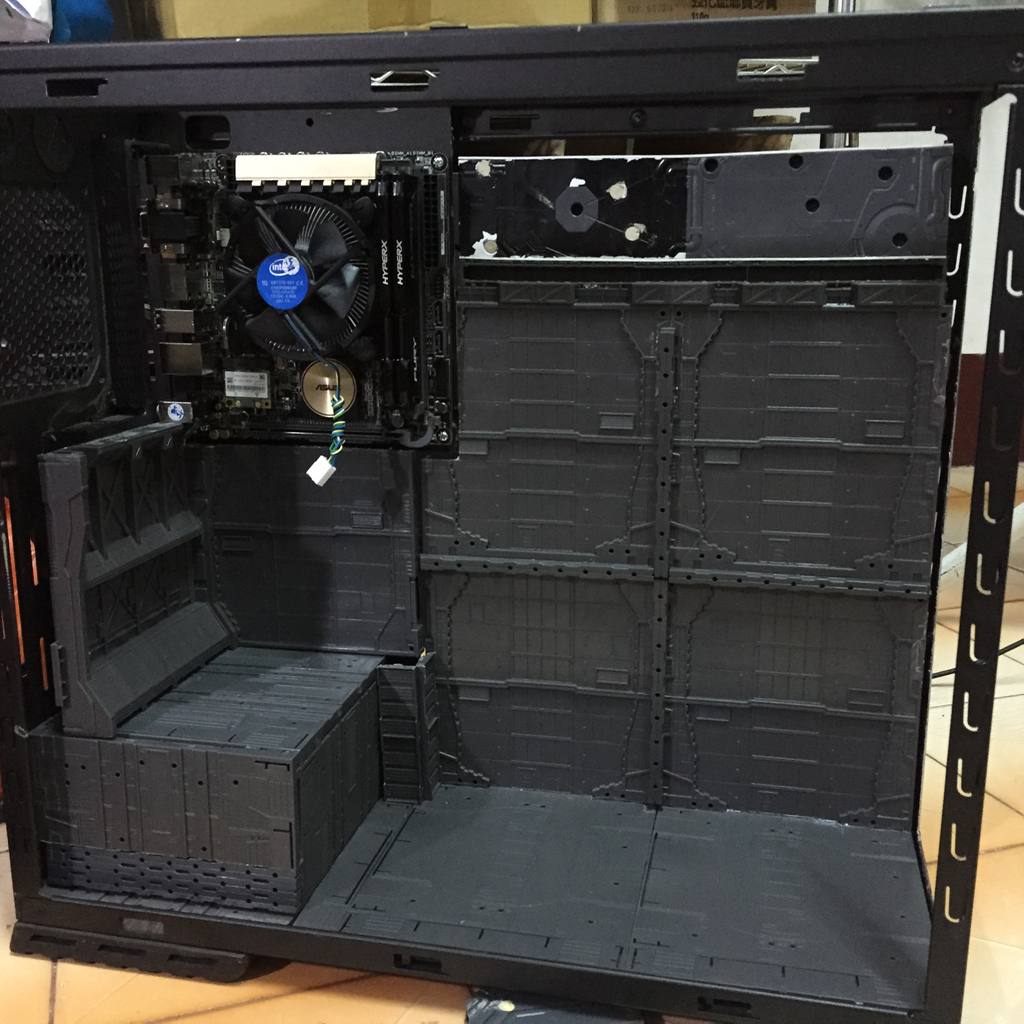
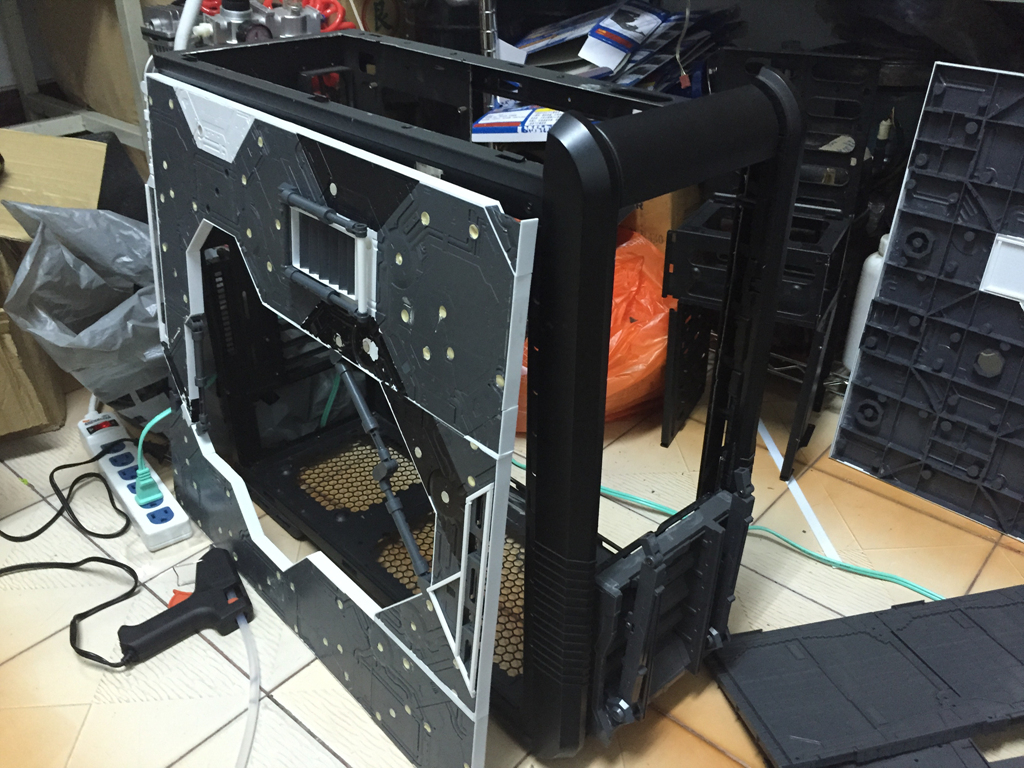
機殼都已經切到幾乎只剩下邊緣的骨架了,側板就保留一些結構強度,再黏上膠板裝飾。
http://picx.xfastest.com/elvis/Event/201508-Garage/08.jpg
http://picx.xfastest.com/elvis/Event/201508-Garage/09.jpg
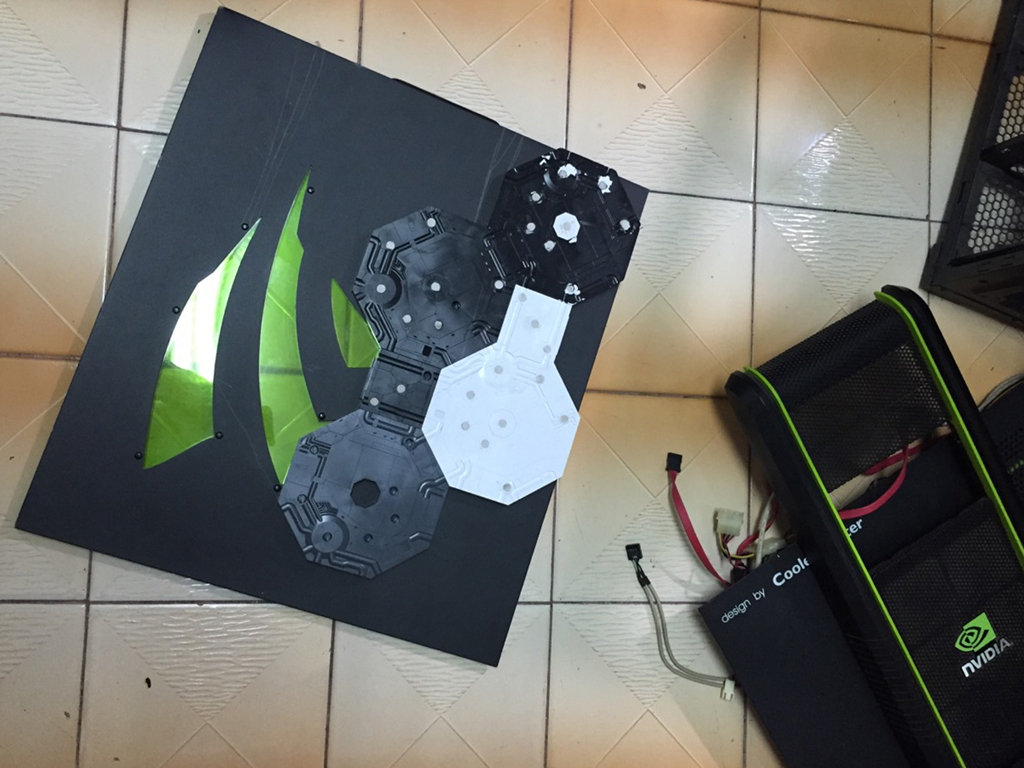
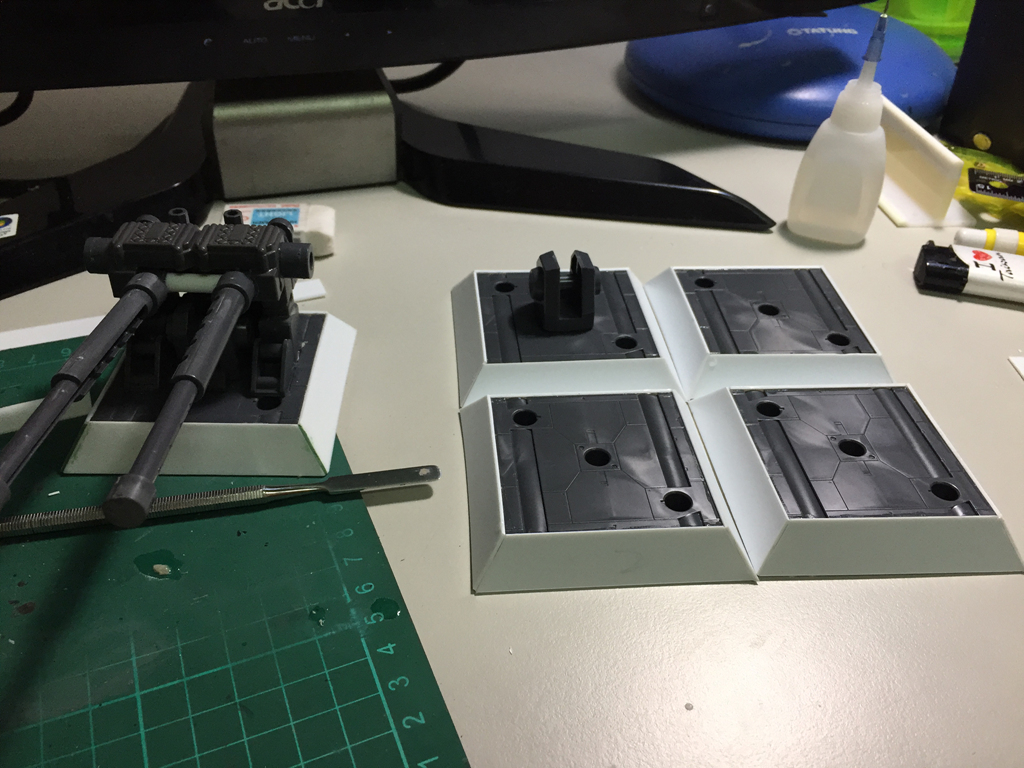
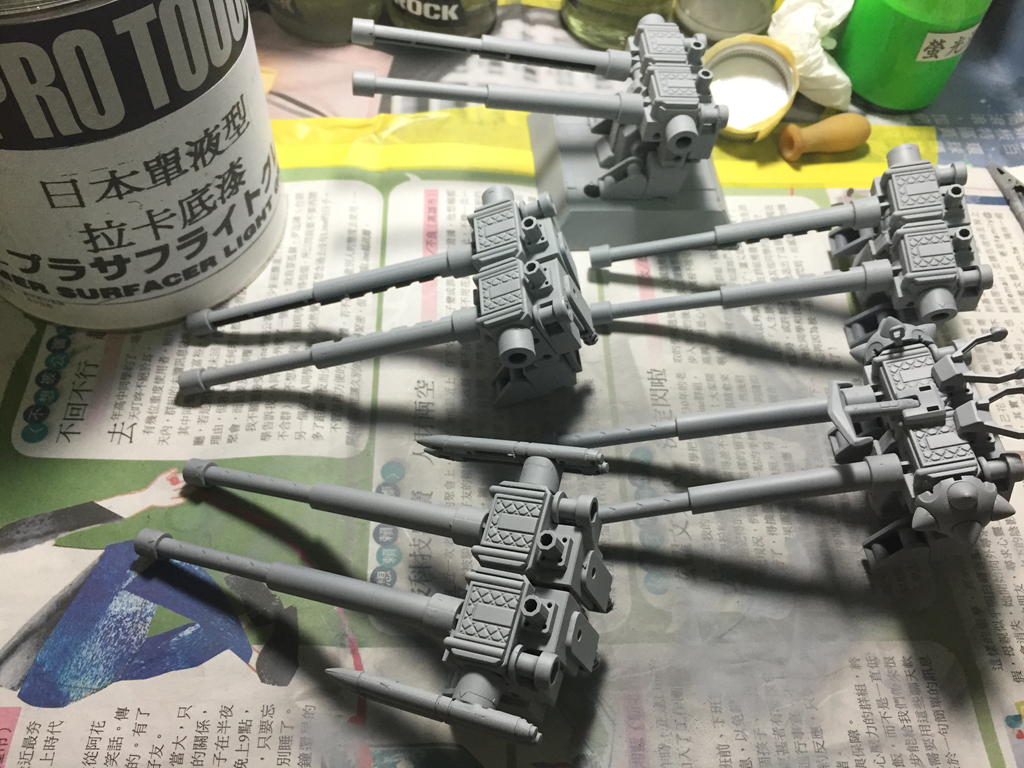
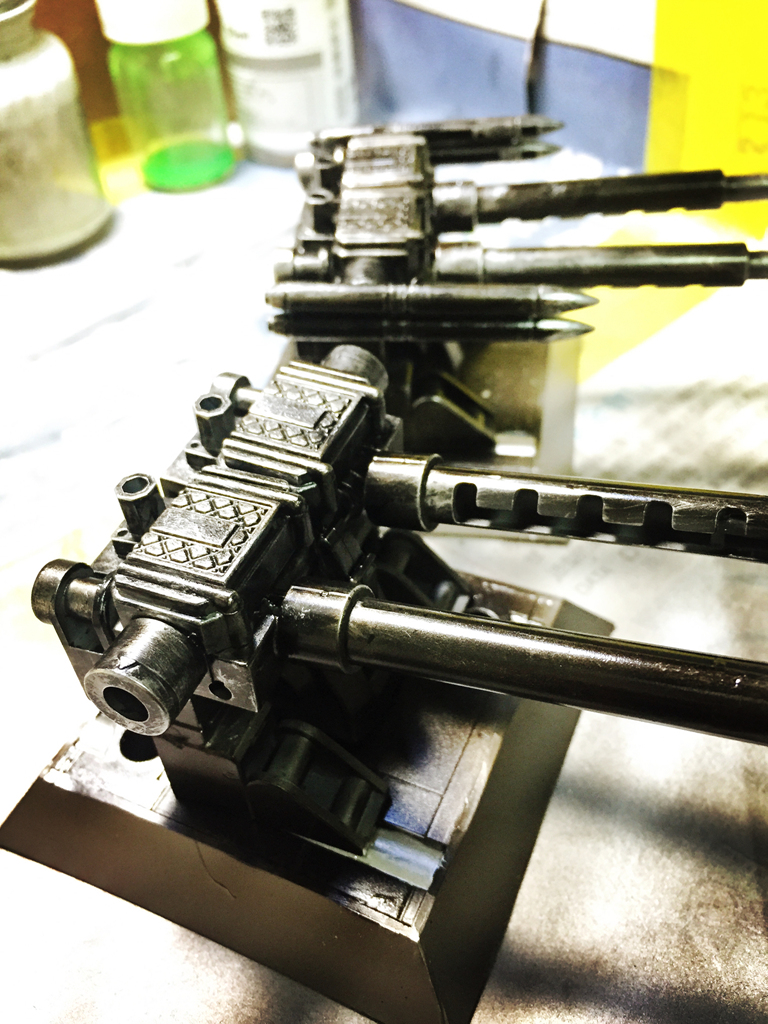
裝飾用的砲台裝置。
http://picx.xfastest.com/elvis/Event/201508-Garage/10.jpg
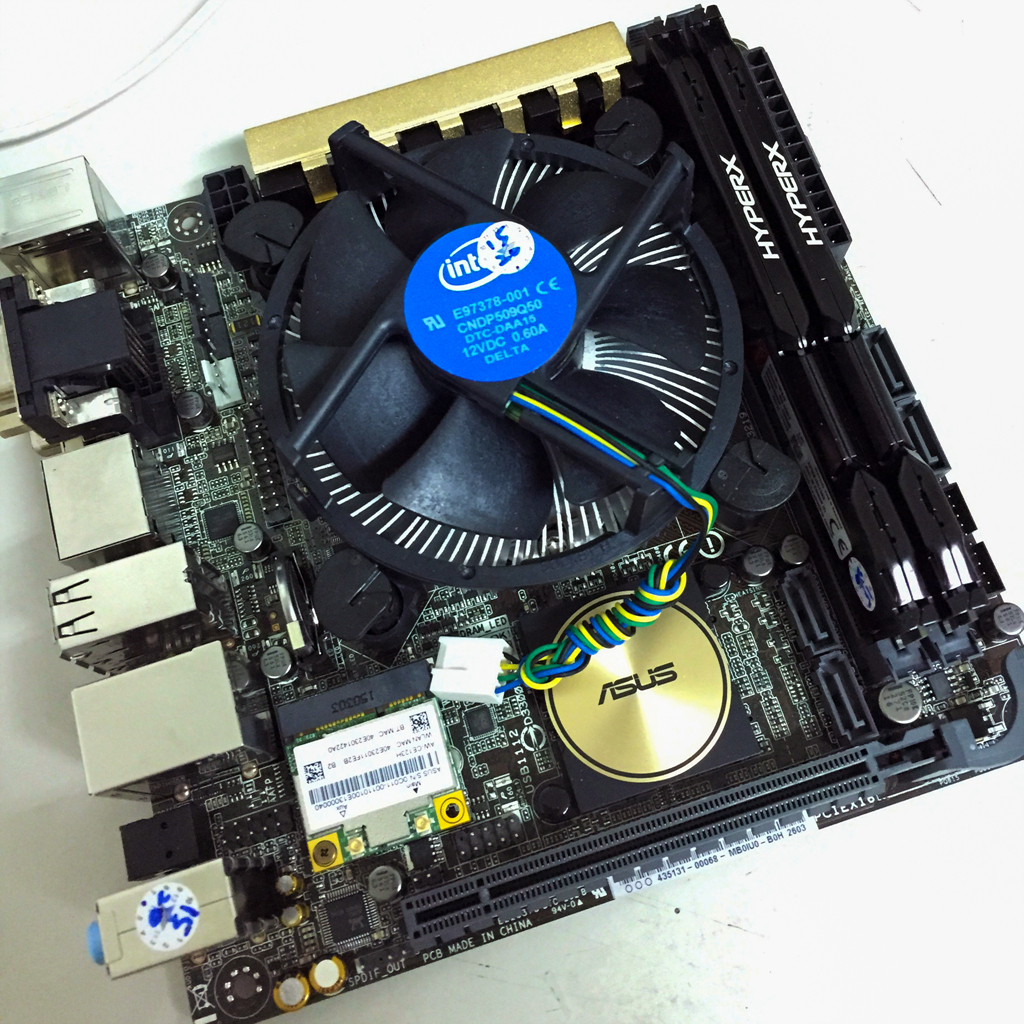
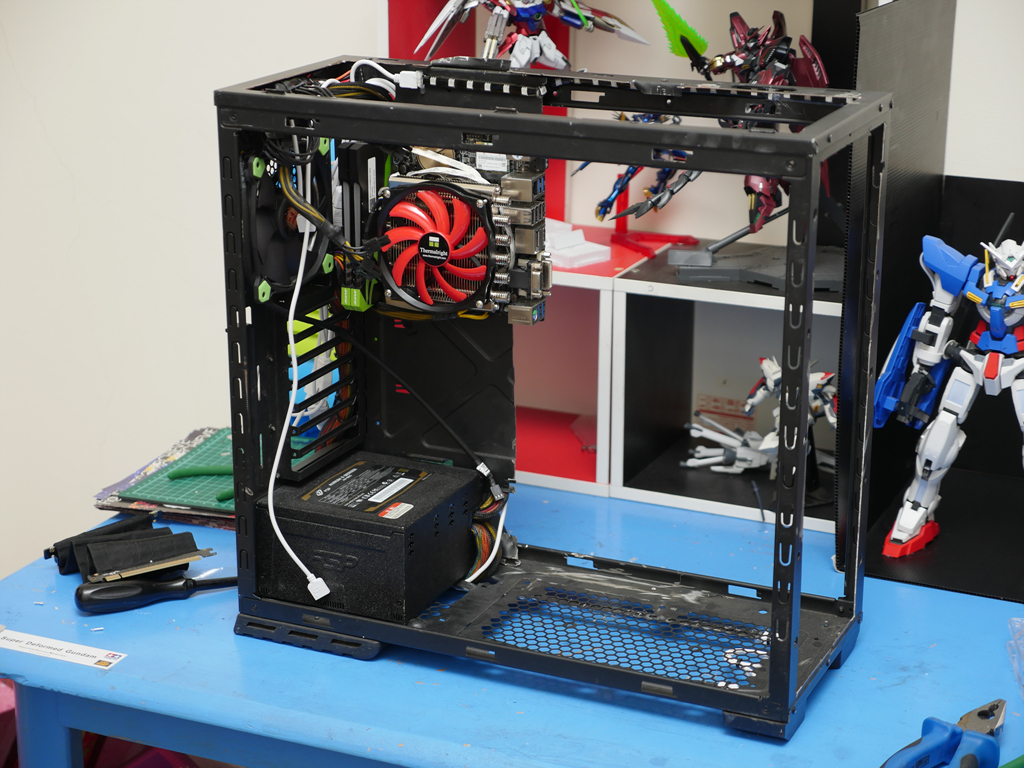
核心零件:Intel Core i5-4460、ASUS Z97i Plus,會選用 mini-ITX 主要還是因為體積小,這樣機殼內部在裝飾的時候會有比較充裕的空間。
http://picx.xfastest.com/elvis/Event/201508-Garage/11.jpg
電源供應器就用 FSP 全漢的 金鈦極 II,雖然外殼樣式挺好看的,但最後還是會被蓋住XD
http://picx.xfastest.com/elvis/Event/201508-Garage/12.jpg
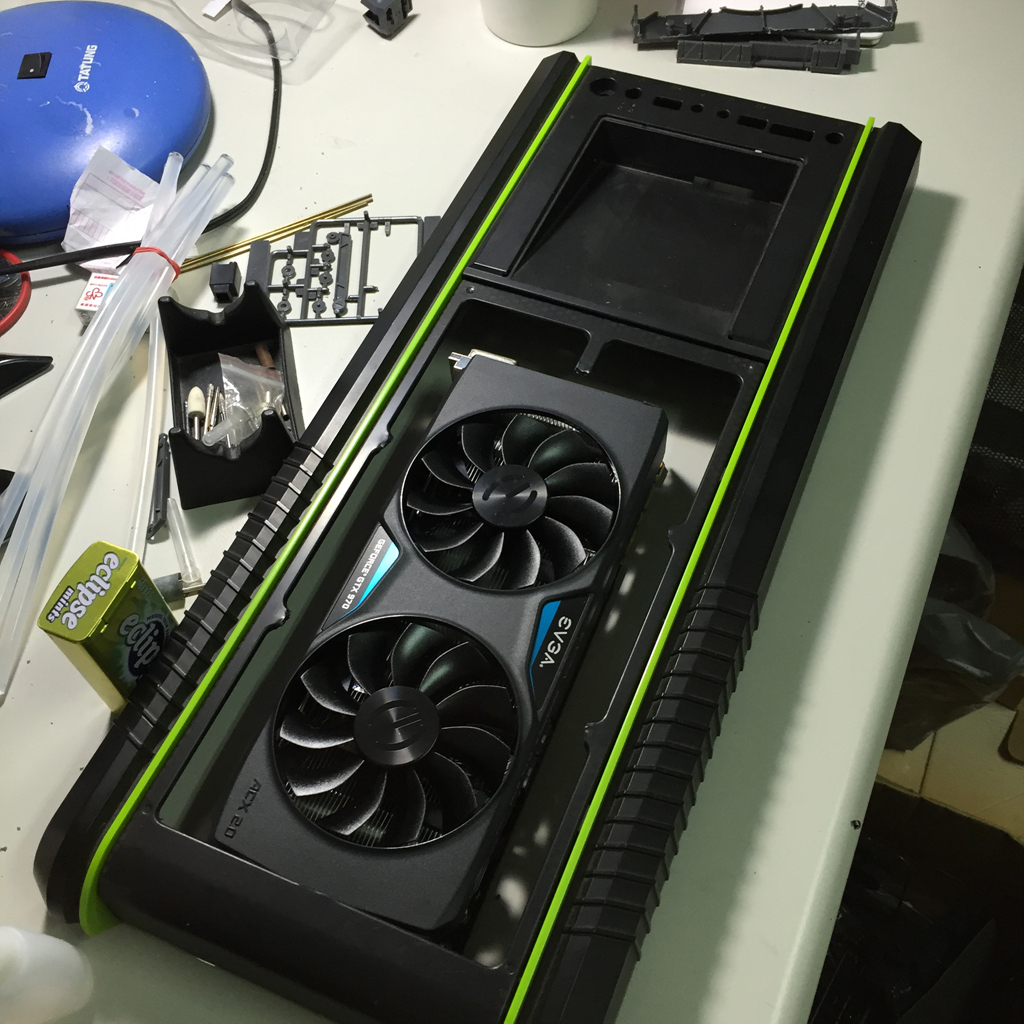
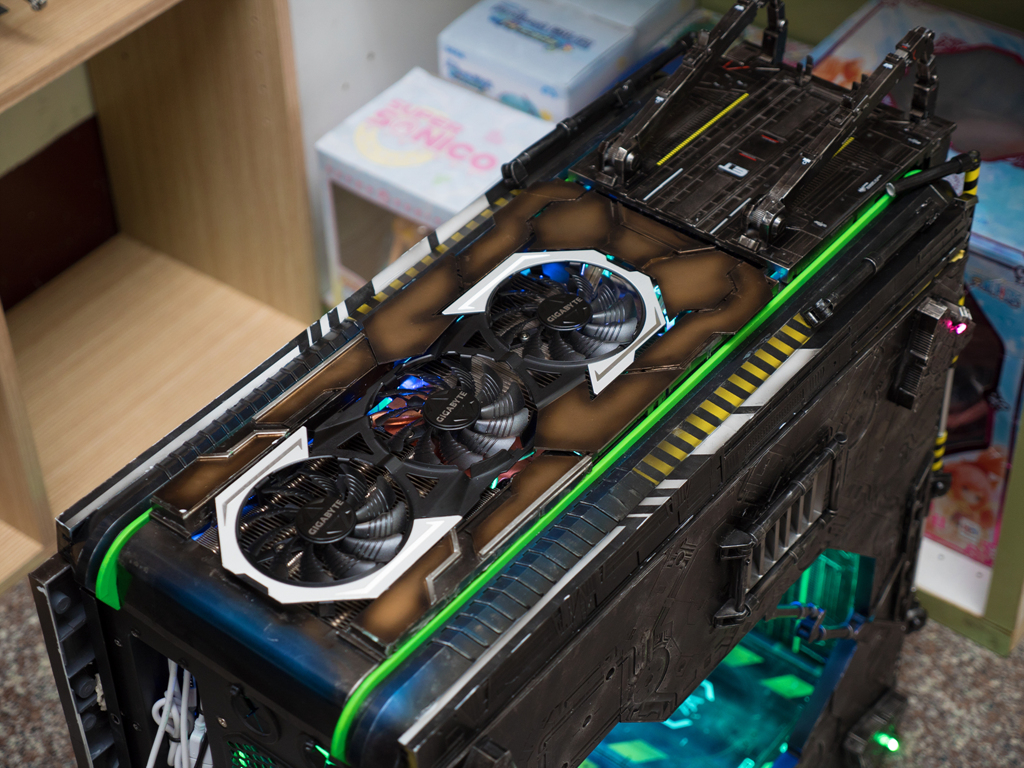
我們決定把顯示卡放在機殼頂部,除了顯眼之外,也讓機殼內部空間更寬敞,所以也把上蓋挖出一個大洞好放顯卡。
http://picx.xfastest.com/elvis/Event/201508-Garage/13.jpg
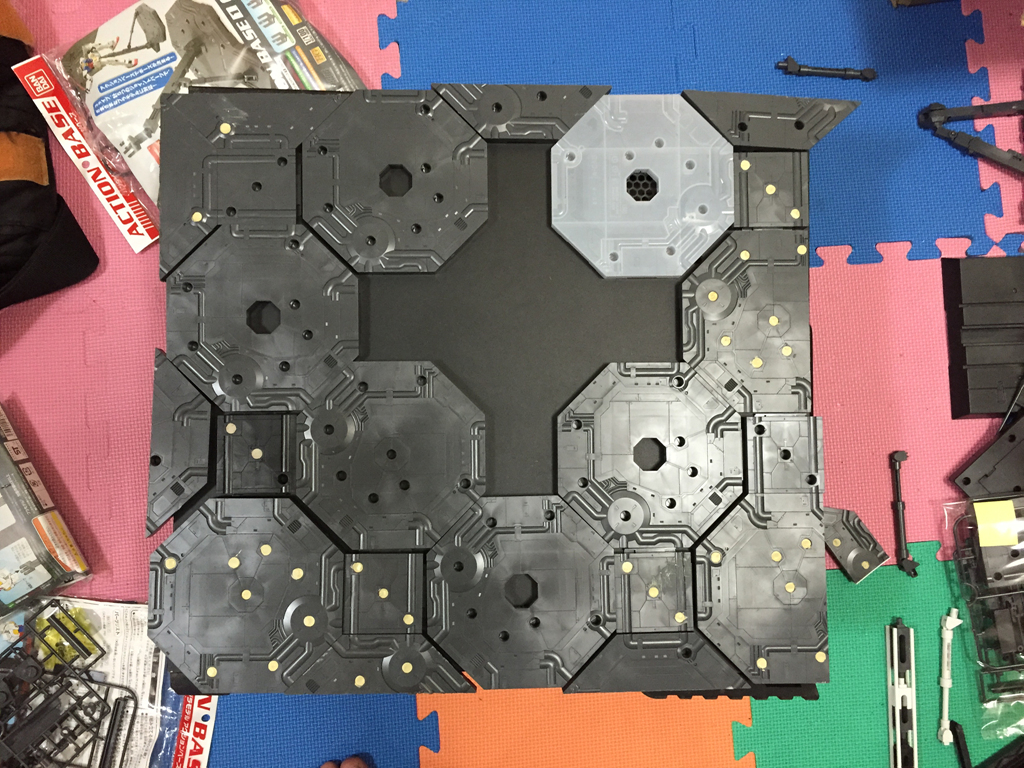
現在把膠板架設在機殼內,這些都是可以活動的拆卸的。
http://picx.xfastest.com/elvis/Event/201508-Garage/14.jpg
http://picx.xfastest.com/elvis/Event/201508-Garage/15.jpg
先試著讓側板與機殼合體,看起來還OK。
http://picx.xfastest.com/elvis/Event/201508-Garage/16.jpg
http://picx.xfastest.com/elvis/Event/201508-Garage/17.jpg
http://picx.xfastest.com/elvis/Event/201508-Garage/18.jpg
接下來就要把這些塑膠零件上漆,只能說上漆這件工作還真不是人幹的,處理完這些工作都有"自己是不是中毒了"那種奇怪的感覺。
http://picx.xfastest.com/elvis/Event/201508-Garage/19.jpg
http://picx.xfastest.com/elvis/Event/201508-Garage/20.jpg
http://picx.xfastest.com/elvis/Event/201508-Garage/21.jpg
但不得不說很滿意上完漆的成果。
http://picx.xfastest.com/elvis/Event/201508-Garage/22.jpg
http://picx.xfastest.com/elvis/Event/201508-Garage/23.jpg
http://picx.xfastest.com/elvis/Event/201508-Garage/24.jpg
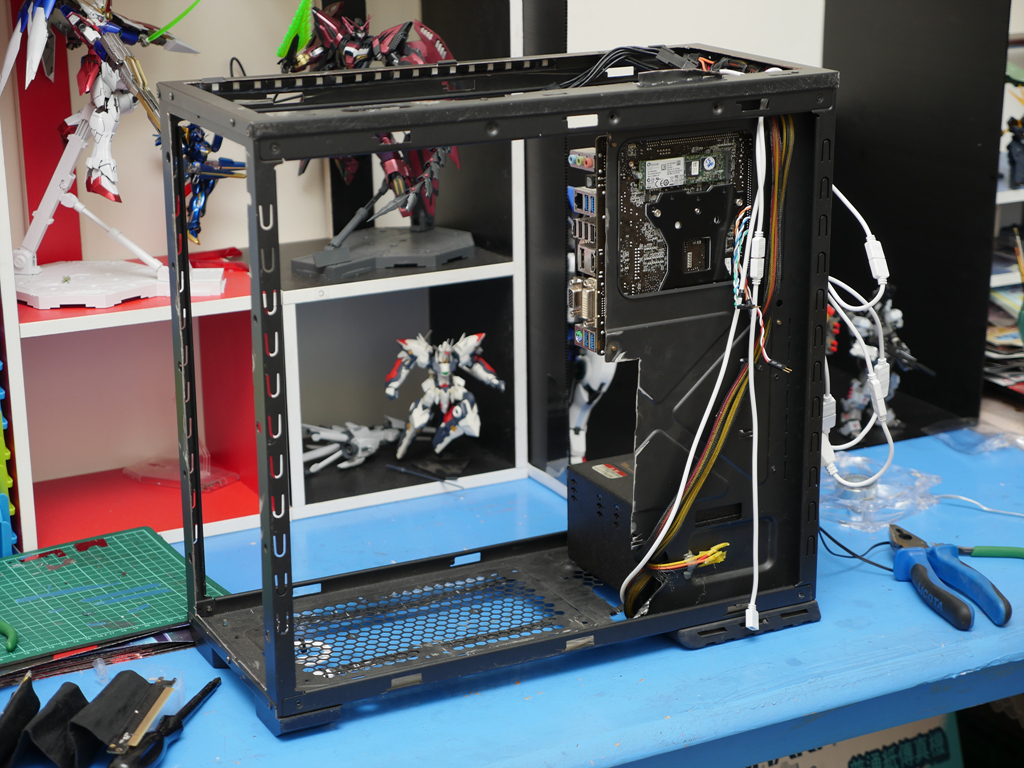
最後的裝設工程,決定讓主機板倒置,這樣與顯示卡連接的延長線不用太長。
http://picx.xfastest.com/elvis/Event/201508-Garage/42.jpg
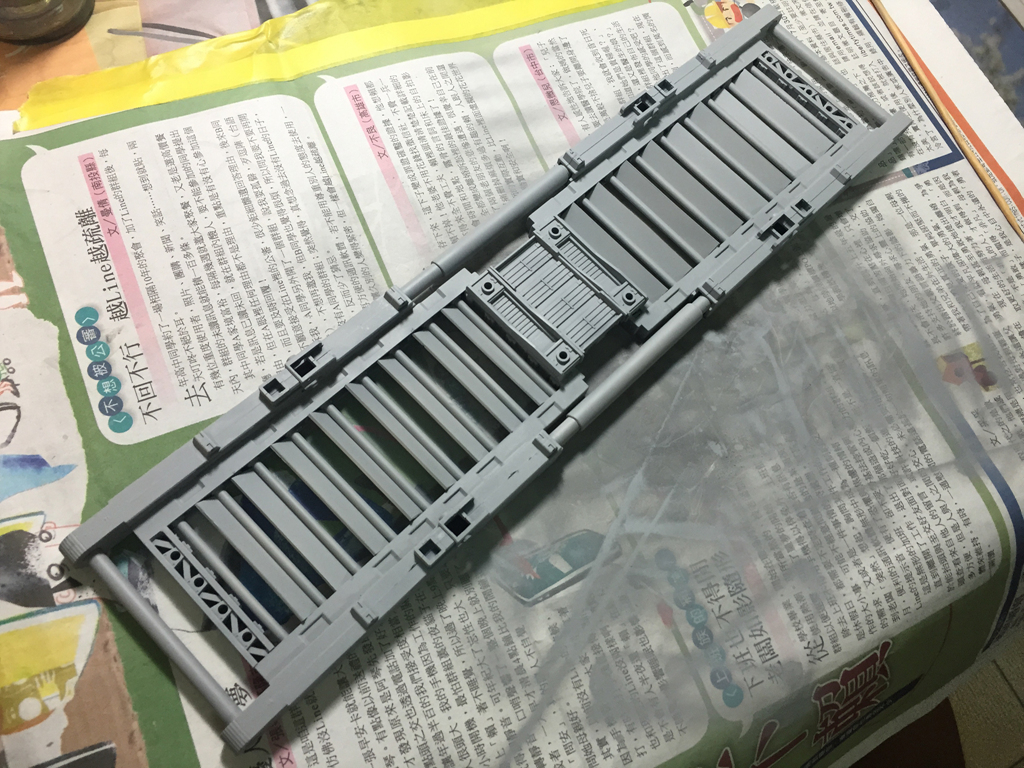
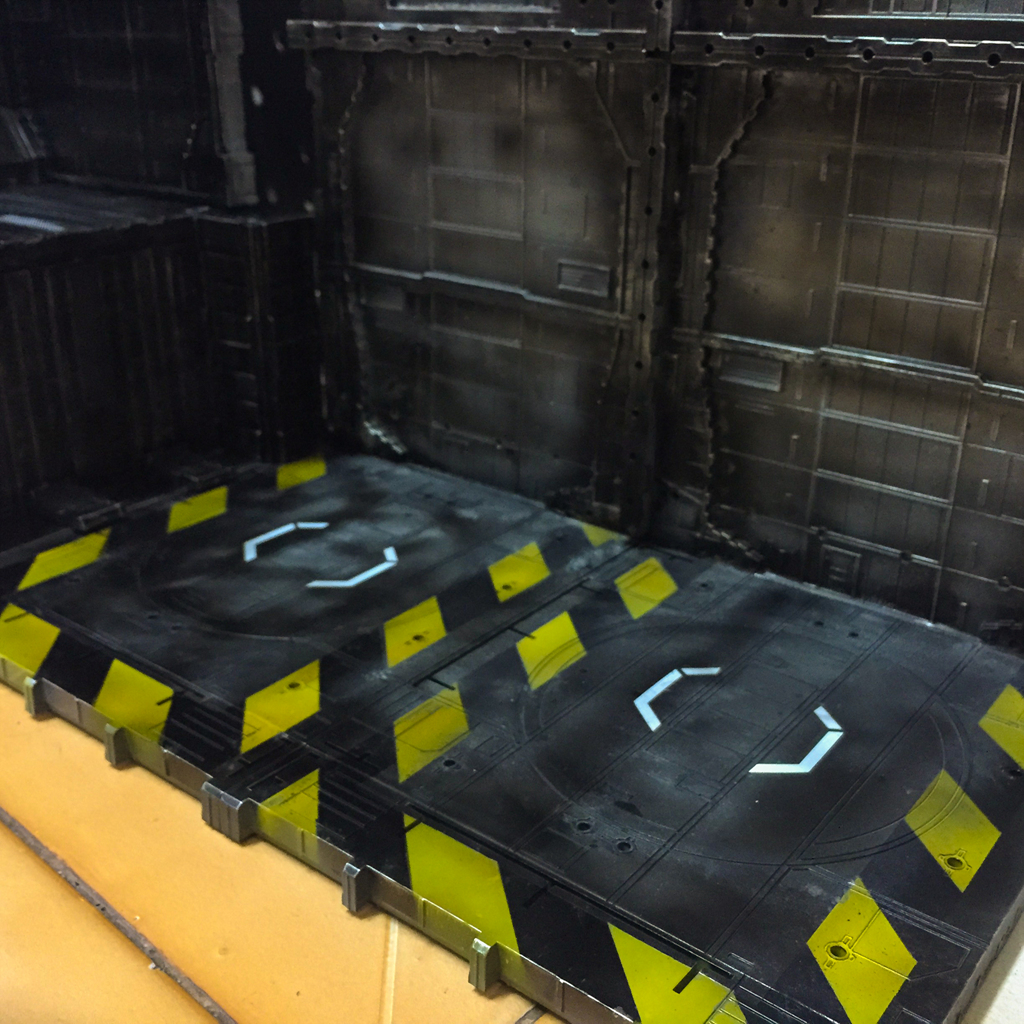
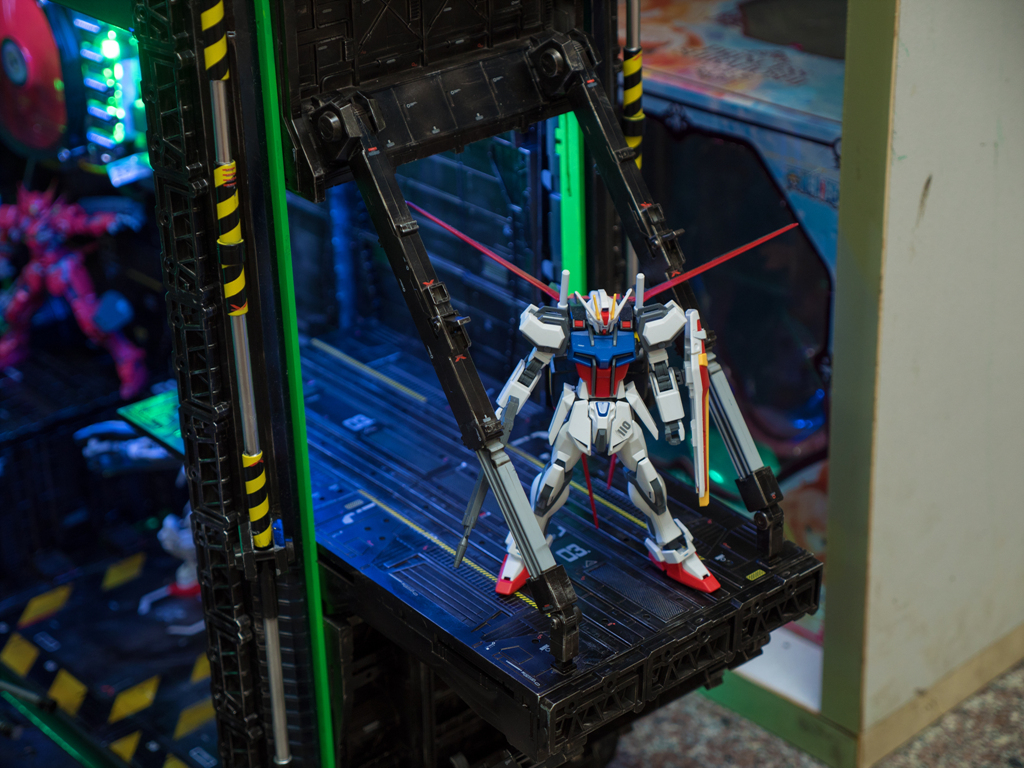
前端面板整片拆除再用格納庫的零件拼裝出可活動式的翻轉發射台。
http://picx.xfastest.com/elvis/Event/201508-Garage/28.jpg
http://picx.xfastest.com/elvis/Event/201508-Garage/25.jpg
http://picx.xfastest.com/elvis/Event/201508-Garage/26.jpg
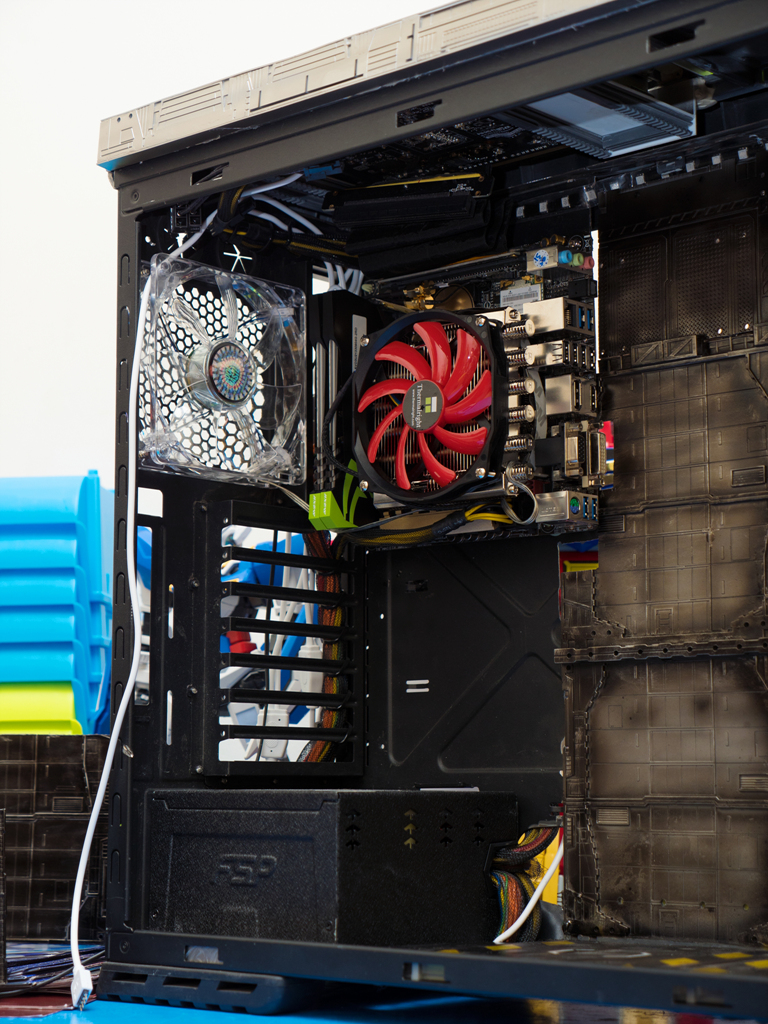
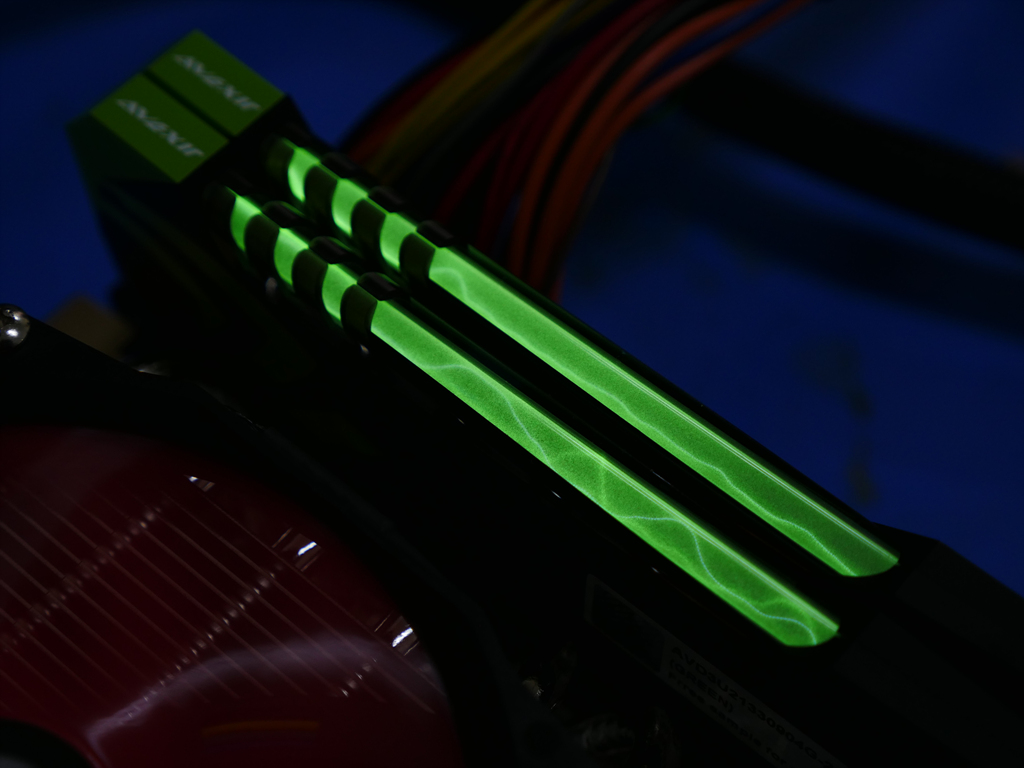
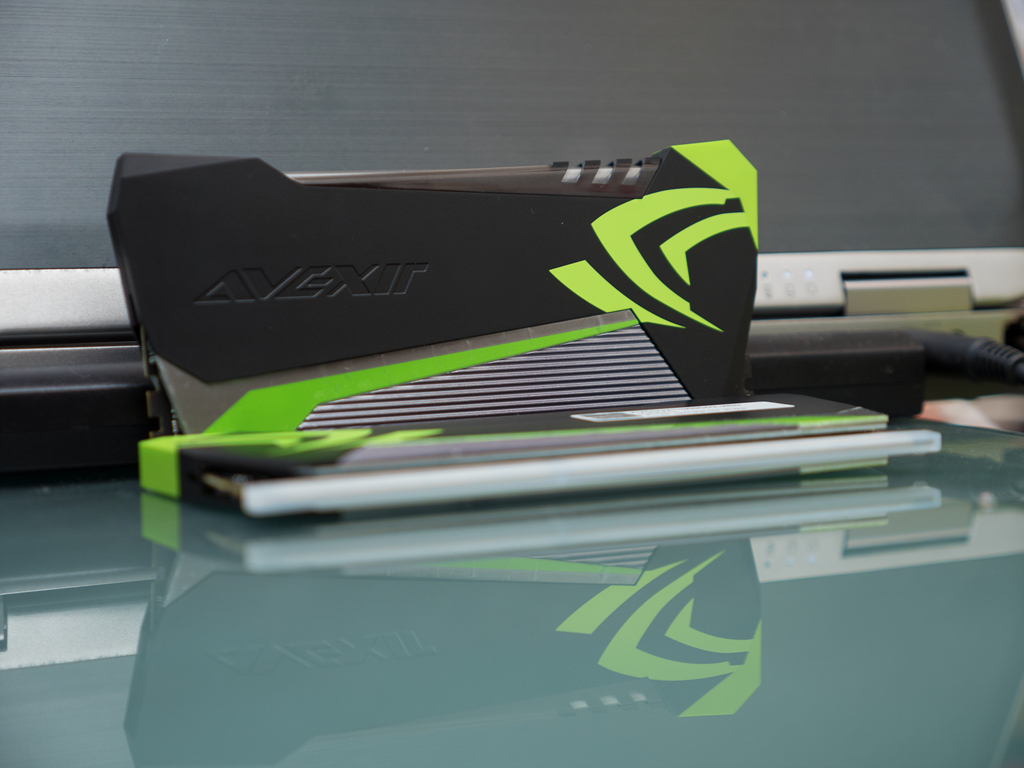
委請 Avexir 宇帷特製帶綠光電漿管的 雷電記憶體 NVIDIA 特仕版也在最後階段到貨,並搭配不會干涉記憶體的 Thermalright 利民 AXP-100 下吹式散熱器同台演出。
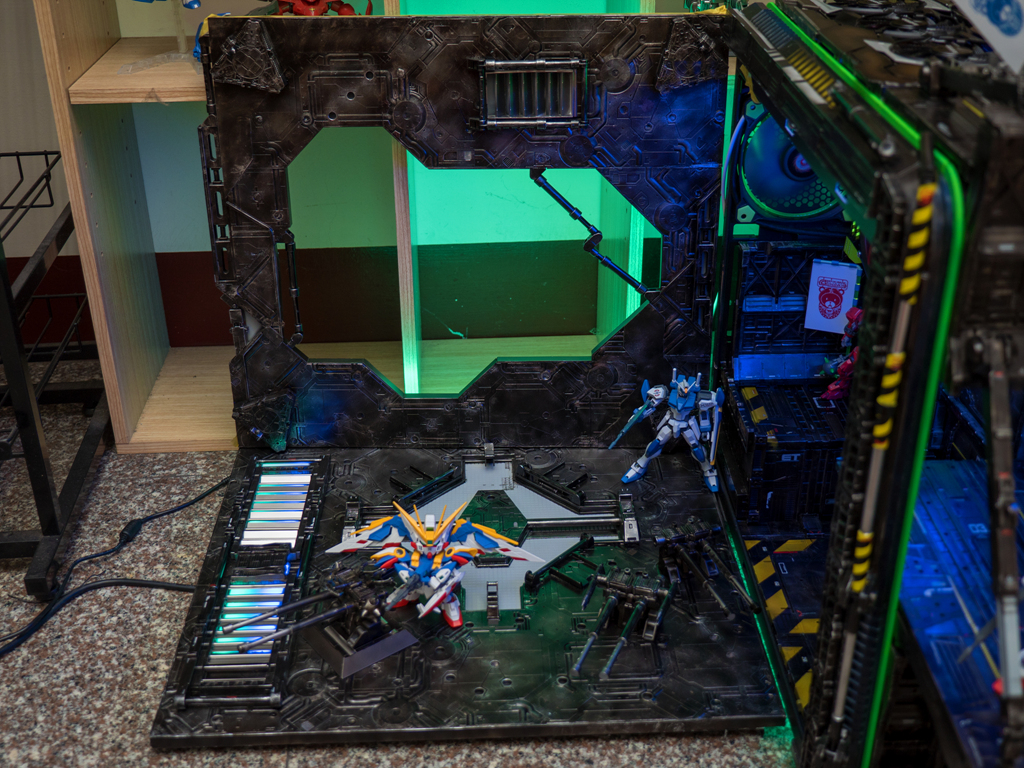
完成品展示
http://picx.xfastest.com/elvis/Event/201508-Garage/29.jpg
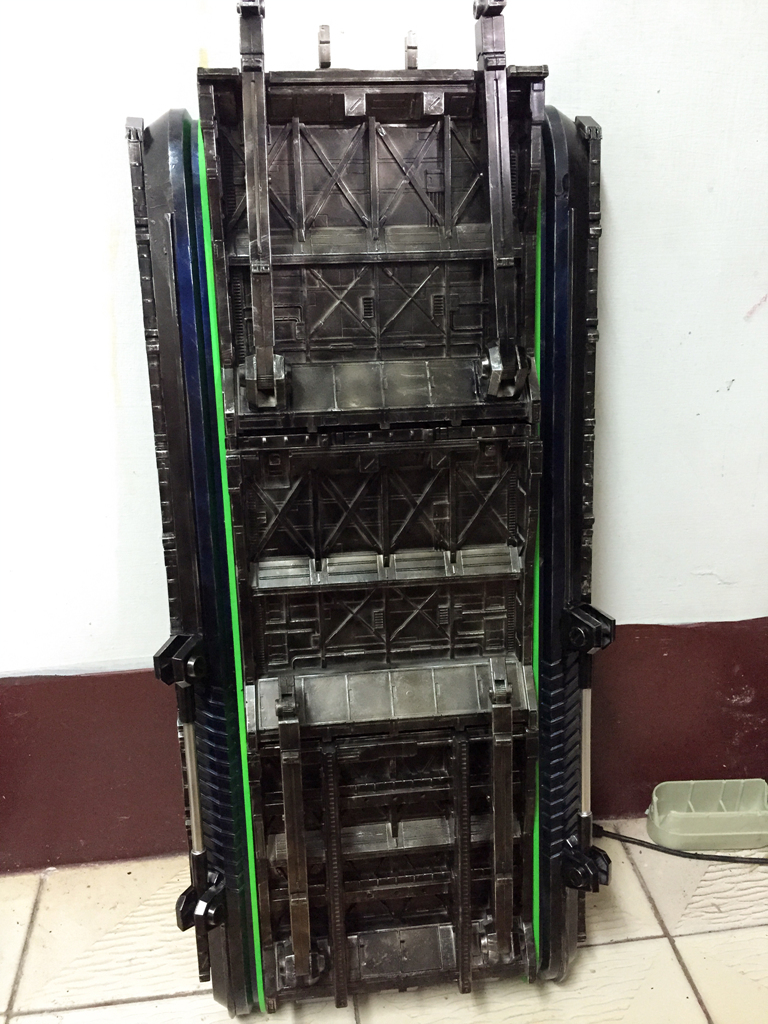
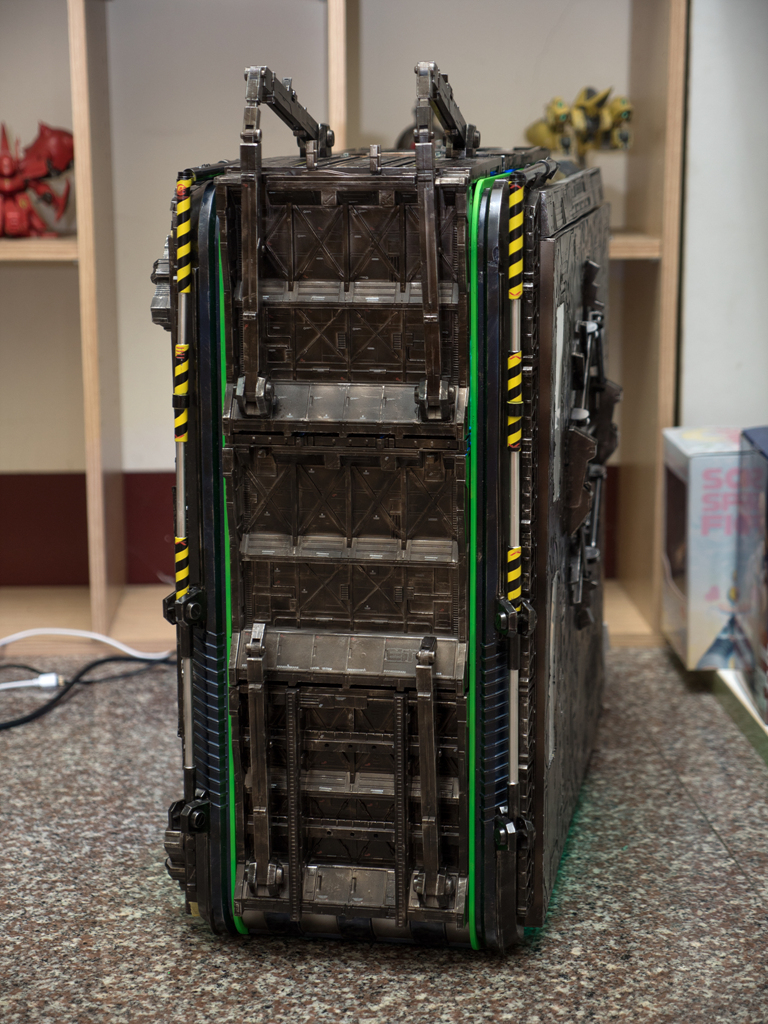
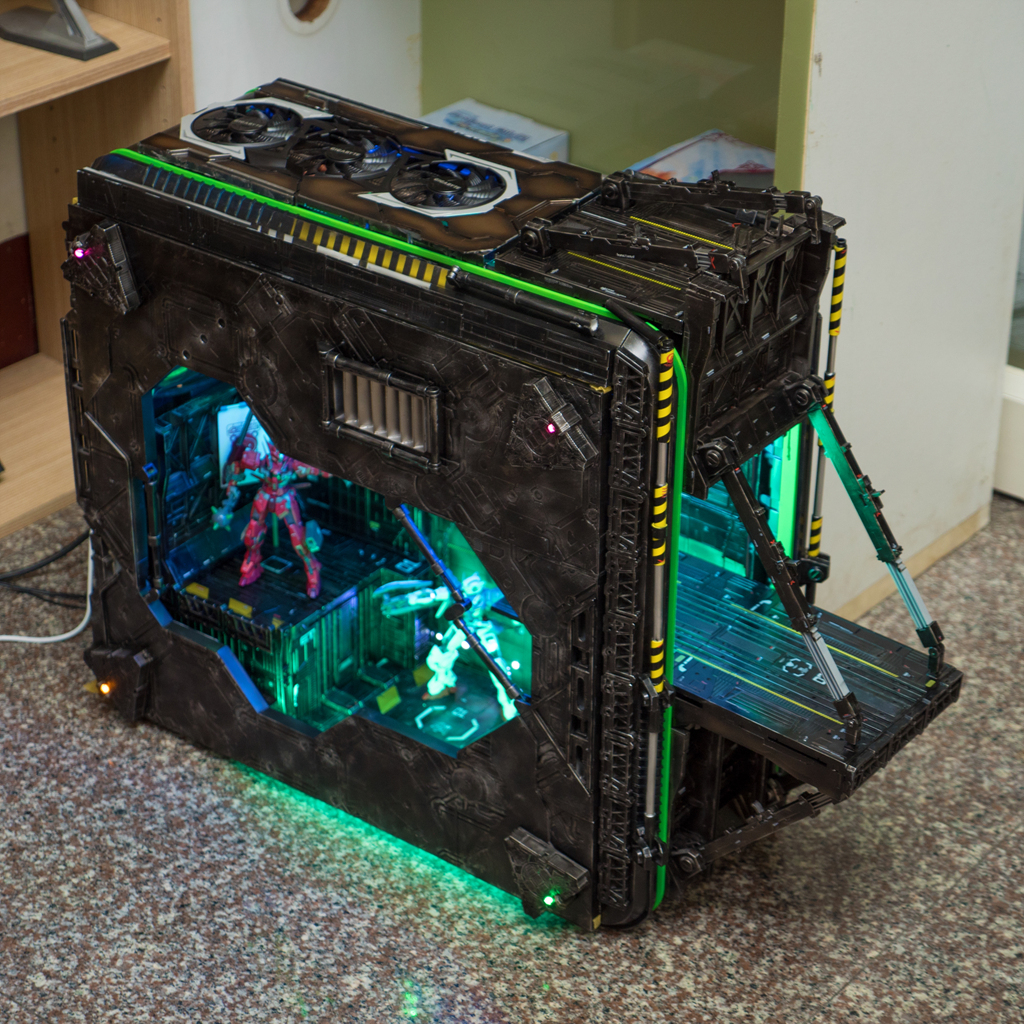
其實機殼的原始造型還在,所以它還算是容易搬運的。
http://picx.xfastest.com/elvis/Event/201508-Garage/30.jpg
半展開模式,鏤空的設計讓霸氣中帶一點神祕感(我到底在說什麼XD)
http://picx.xfastest.com/elvis/Event/201508-Garage/31.jpg
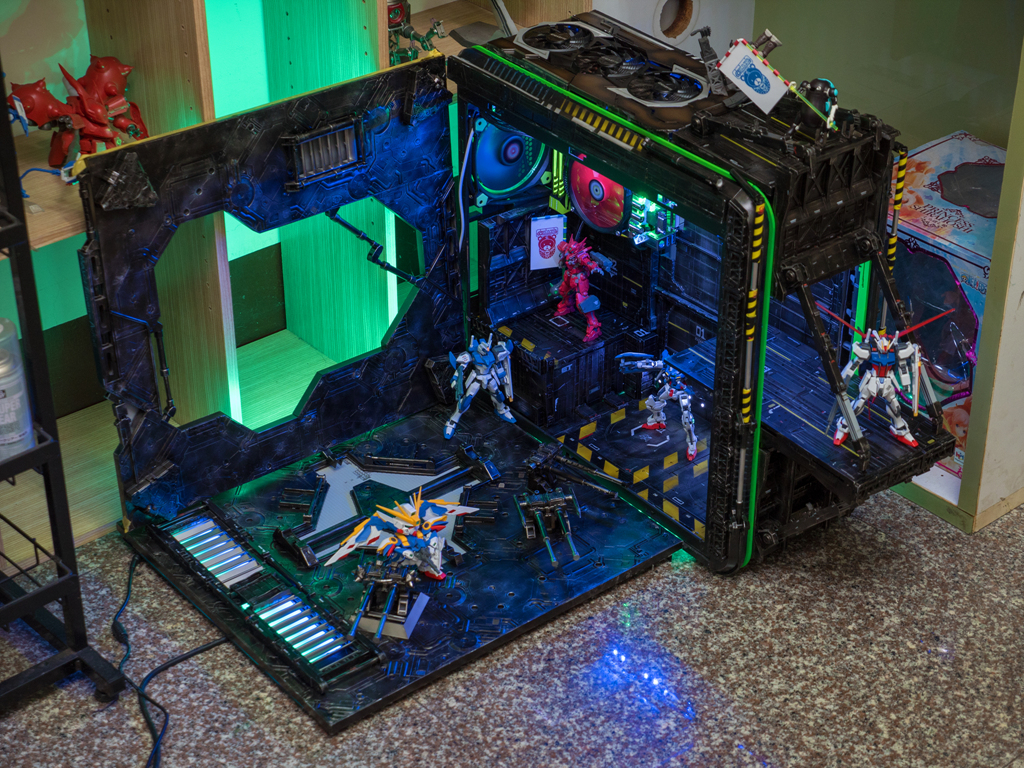
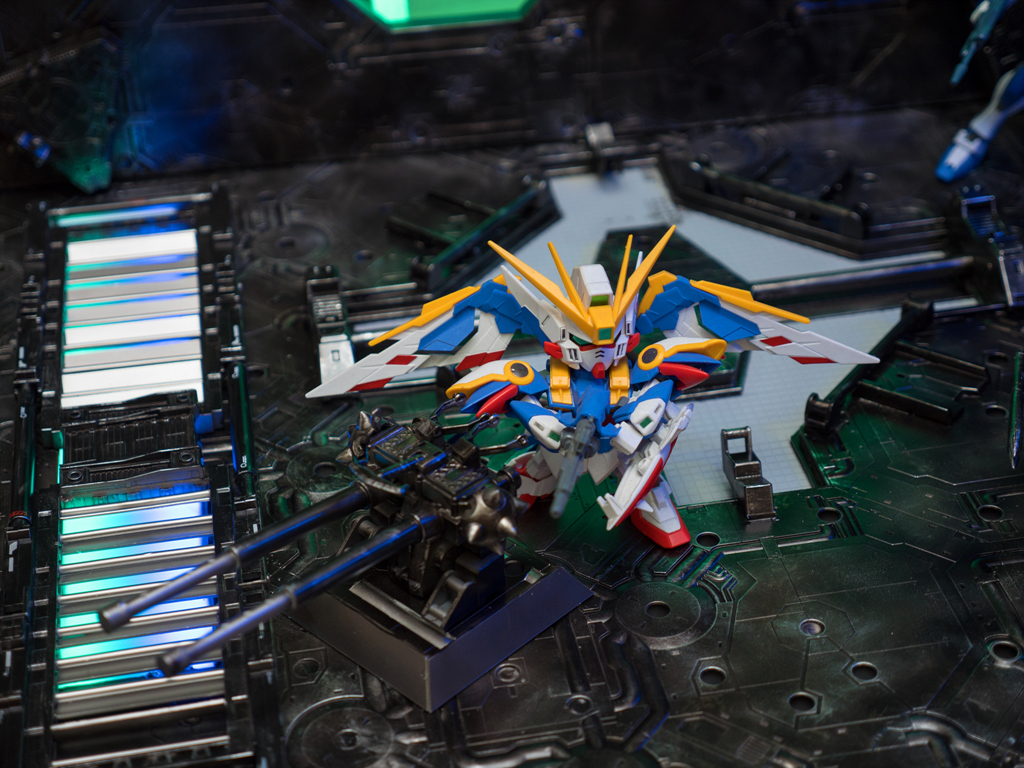
全展開模式,這樣就可以擺很多架模型了,一個【格納庫】的概念!
http://picx.xfastest.com/elvis/Event/201508-Garage/32.jpg
http://picx.xfastest.com/elvis/Event/201508-Garage/33.jpg
內部加裝不少燈條,就是要閃瞎你XD
http://picx.xfastest.com/elvis/Event/201508-Garage/34.jpg
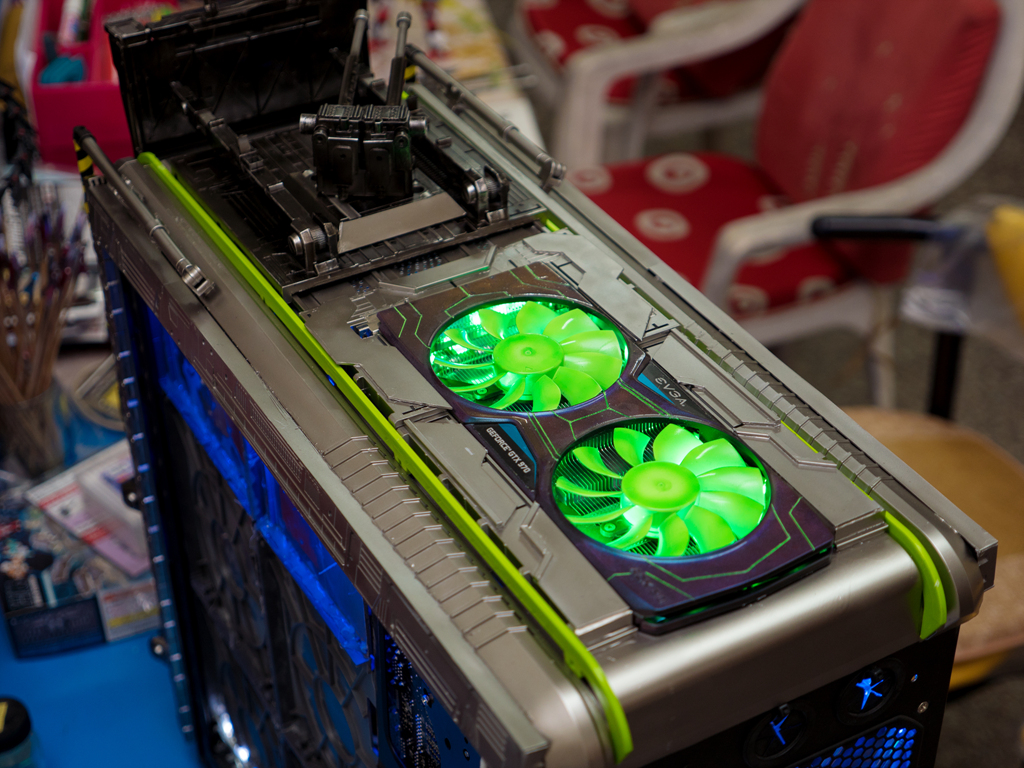
其實一開始是打算直接讓 EVGA GTX 970 ACX 上場。
http://picx.xfastest.com/elvis/Event/201508-Garage/35.jpg
不過後來看上三風扇的 GIGABYTE 技嘉 GTX 980 Ti 風之力,它的散熱器造型很有機甲風格,更搭配作品主題。
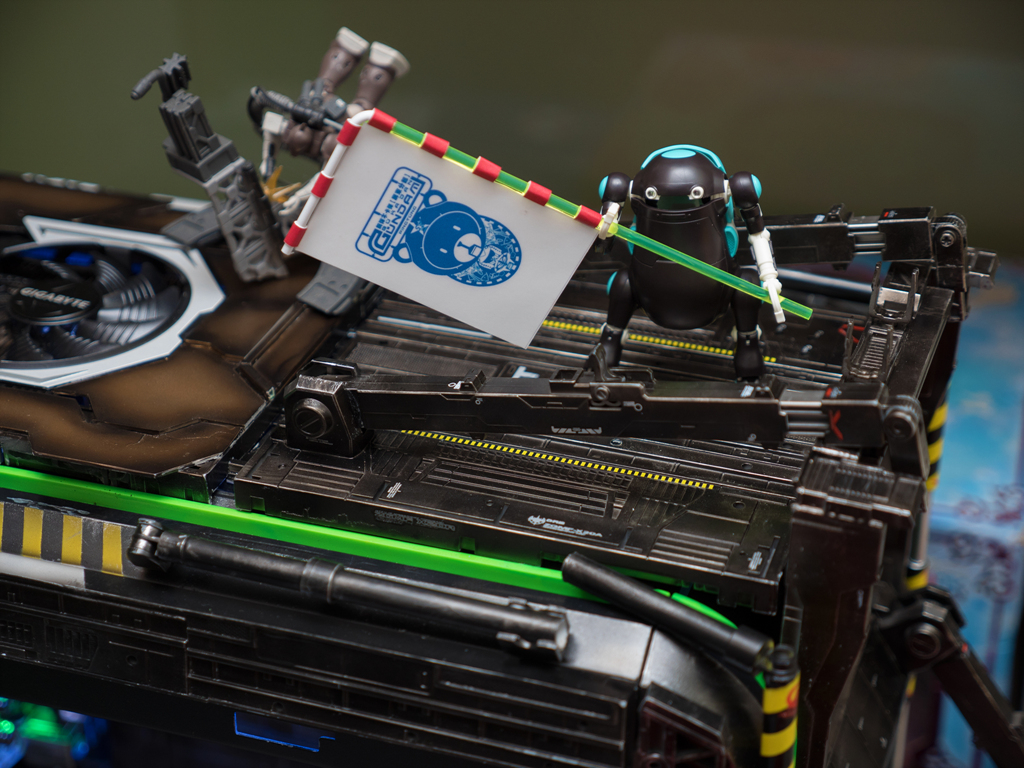
其餘模型展示
http://picx.xfastest.com/elvis/Event/201508-Garage/36.jpg
http://picx.xfastest.com/elvis/Event/201508-Garage/37.jpg
http://picx.xfastest.com/elvis/Event/201508-Garage/38.jpg
http://picx.xfastest.com/elvis/Event/201508-Garage/39.jpg
http://picx.xfastest.com/elvis/Event/201508-Garage/40.jpg
製作團隊合影
http://picx.xfastest.com/elvis/Event/201508-Garage/41.jpg
右邊是 mayortw 寬拔,一開始的發想和結構設計都是靠他;左邊的是我本人,幫忙構思主題以及規劃硬體配置;中間的是【鋼彈不卡彈屏東分部】的站長,感謝他提供我們為數不少的精美模型作品。
--
--
您真聰明XD
因為是特別訂製的,據說中國有機會上市,台灣方面要向Avexir宇帷詢問會比較清楚
因為顯卡的視訊IO是朝向內部,我們有拉一條HDMI線到後端,是可以正常開機的。
沒錯沒錯
※ 批踢踢實業坊(ptt.cc), 來自: 36.224.219.84※ 文章網址: https://www.ptt.cc/bbs/PC_Shopping/M.1443967738.A.B43.html
推 ang728:想顯示他們超Z害 07/19 12:21
推 Cubelia : 太神LA 10/04 22:17
推 newdreams : 推一下 10/04 22:22
推 roys606 : 推 10/04 22:22
→ badofn : 我好像沒有看到硬碟= =? 10/04 22:35
推 aster111598 : 推個 10/04 22:36
→ Cubelia : 因為用的是M.2 SSD,在主機板後面 10/04 22:36
推 kivx : 跪了 10/04 22:37
推 zcbmaa : RAM太炫炮 會上市嗎? XD 10/04 22:37
→ x000032001 : 感覺應該讓他可以開機..打個遊戲 完成度比較高 10/04 22:39
→ x000032001 : 主要是顯示卡的IO怎麼接的看不太明白 10/04 22:41
推 anchor : 怎麼沒看到pcie16延長線? 有裝嗎? 10/04 23:19
→ Cubelia : 主板有轉方向,所以PCI-E x16是在上方 10/04 23:23
推 zxp910510 : 太強了 推一下 10/05 00:52
推 SilverFox : 有看有推 10/05 01:12
→ nakayamayyt : 好厲害 10/05 01:28
推 silver00 : 太強了 10/05 01:45
推 WeAntiTVBS : 太Lee害了 10/05 02:32
推 jonaswang01 : 豪強啊! 10/05 03:23
推 sk10037643 : 有神快拜 10/05 08:33
推 yoyostar1990: 玩出花來了 10/05 08:39
推 xxq2112 : 有看有推 10/05 08:46
推 nocturnesw : 太神了 10/05 09:19
推 rcat2010 : 有神快敗~~ 10/05 10:02
推 chancewen : ORz...跪了 10/05 12:26
推 korsg : 酷炫欸~~~ 10/05 12:49
推 sarspieya521: 有沒有這麼專業!?已跪 10/05 14:17
推 jerry140147 : 跪了 10/05 14:45
推 kuminer : 天啊 太威猛了這個~ 10/05 15:31
推 petingo : 專業!! 10/05 17:44
推 xul327 : 神 10/05 17:59
推 yehnshin : 超強!! 10/05 18:31
推 becca945 : /kneel 10/05 19:08
推 tentryway : 猛猛DER~ 10/05 23:00
推 kao322322 : 超猛怒推 10/06 01:52
推 dears0312 : 猛推ㄧ個 10/06 03:32
推 GHOSTDOG : 那隻SD害我笑了...厲害 !! 10/06 20:13
推 line43211 : 太專業了啦,這個放在家一定很猛 10/06 22:55